
The thickness of the laminations will determine the draw weight of the bow and the taper will help define the curve of the limbs. Using the Bingham's draw weight chart, for a 1 3/4" width 62" take down recurve between 50 and 55 lbs. I need a thickness between .256 and .262
My .002 tapered laminations will come in at .120 in thickness at the thick side. The taper of .002 denotes a rate that for every inch in length the thickness will decrease by .002 inches. How to do that. Honestly I had no idea in hell as to how. But luckily the boys over at Pirates do and they showed me how. Thanks to J. willis there with his explination of the lam sled.
I'm sure those with a firm understanding of math and some nice shop tools could whip up some tapers from scratch, I have neither so I took the easy way out. First get a template or in other words buy a .002 tapered lamination. So I drop a line to Kenny over at Kenny's Custom Archery and he hooks me up with a .002 and a .001 lamination to use as templates. Quicker than you can say "you've got mail" they arrive.
Now what to do with them. If you said make a sled, your correct. The sled will allow us to put a square piece of stock on top of the taper and after running it through the sander (lam grinder) it comes out with the same proportions.
Look at my highly detailed schematic of this concept which is actually a rip off of a much more experienced bowyer, Sam Harper you can see that as the two laminations are run through the grinder, the top (non-tapered)lam gets gound down to a oposite mirrored profile of the template. Pretty cool huh? I thought so anyway.

Sam's site also gave me the concept on how to create the lam grinder as he had the same type of belt sander as I did. Thanks Sam!

Basically it's a table that that sits in between the raised arm of my belt sander and the motor housing. The front end (left) has a bolt with a nob on it that can be turned to raise the platform thereby pushing it closer to the sanding arm. In use I generally run a piece of stock through, flip it, run it through again etc. Some times I'll run it through twice per side starting at different ends then flip it and do the same to the other side, turn the nob 1/8 to 1/4 of a turn and reapeat until I get my desired thickness which is checked with a set of digital calipers. It's not pretty but it works pretty well.
Some guys have some pretty nice set ups using drum sanders for their lam grinders, like Jim Willis over at Pirates, but I'm a garage ninny and have to make use of what I have.
Now for the sled. Jim clued me into this set up where he used double sided tape to secure the template to a piece of material (wood, aluminum what ever) I used a scrap piece of aluminum that was straight and level, then tape some 150 grit sandpaper on top of that to keep your square stock from moving around. The whole thing goes through the sander as one piece.
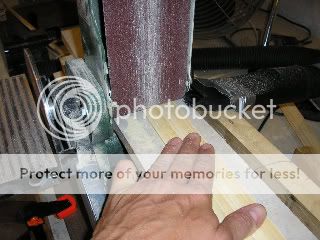
This is a picture of my sled in the grinder. The thinest side is in the front (left) with the thickest side to the right. When I put a piece of square lamination on top of that and run it through the sander (many times) my newly created tapered lamination will have its thinest end to the right and its thickest to the left or front of the sled.

The prallel laminations are put through the grinder without the use of any sled until I reached the desired thickness.
Next up are the limb wedges.
No comments:
Post a Comment